
Basic Air Mechanics: Explanation
Basics of Fighter vs Fighter:
- Do not double mission (be on air superiority, unless the enemy has only bombers in the airzone)
- Every fighter wing must be fully trained before any combat ( your teams asks for “more air”): you can train airwings to full by shift+click aircraft exercises.
- Do not fight more with less
- Do not take bad trades (unless there is a strategic reason explicitly demanded by team majors)
Air Efficiency:
- Determined by: Average coverage of the airzone, Airfield Supply, Weather
- Efficiency takes time to build up (~5 days) when aircraft starts flying in a new zone/from a new airport, so do not move air around unnecessarily!
- Effect: The air efficiency percentage is the percentage of your planes actually conducting the mission in the airzone. Ex. 10k fighters with 60% efficiency on air superiority ⇒ effectively 6k fighters.
Airfield Supply:
- Affected by: Distance from nearby supply hubs to the airfield, divisions/fleet on the airfield tile, motorization of nearby supply hubs –
- Effect: Huge impact on the efficiency of aircraft flying from the airfield. (In general, make sure airfield supply is 100%). Check by hovering over the airfield in supply map mode.
- In practice, make or request lend-lease of motorized to motorize all supply hubs in relevant areas, ask your team to build supply ports for airfields with no supply hubs close by, ask your team to move divisions and fleet away from airfield tiles.
- In addition to airfield supply, the controller of the territory must have a open path for fuel to flow into the airport. For example, if Italy blocks all seazones in the med, it might still show 100% supply for african airfields, but there is no path for fuel to flow into capital from rome. In that case the air efficiency is also destroyed. Make sure you check with your teammates about their supply route status!
Air Detection:
- Affected by: Number of planes in the airzone, radar, weather
- Effect: percentage of enemy targets that can be targeted by you (includes enemy planes, ships)
- In practice, for high-coverage airzones >1000 fighters give effectively saturated air detection. For large seazones, some radar coverage is highly desirable (lvl 1 radar included) Naval bombing
- Against submarines: concentrate all available naval bombers in one seazone. When possible, also put fighters on air superiority over the airzone to increase air detection
Path Interception:
- Your aircraft can be shot down by enemy fighters flying into the airzone you take off from, or any airzone your aircraft passes through.
- Make sure you are always checking all airzones you are passing through/taking off from to make sure they are clear of enemy fighters. If there are enemy fighters path-intercepting you in them, you must react quickly by putting at least as many fighters into that airzone.
- You can also use this mechanic to defend against superior fighter count by trying to do path-interception and avoiding direct fighter trades.
Daytime / Nighttime Flying:
- Day/night only flying resets efficiency, so do not use them. (only use default day+night)
Strategic Bombing:
- Bombing priority: bombers target closer states more than further states. In practice, to effectively bomb an airzone spread out bombers to come from various directions if possible
Aircraft Conversion
In principle, aircraft conversion is a procedure where instead of having military factories produce full aircraft, one assigns one group of factories to build the airframe, and another group of factories to mount the modules onto the airframe.
The benefit is the group of factories mounting the modules do not cost aluminum, hence saving the faction resources and reducing owned civ requirements for trade. Note that this procedure does not save ic, as even with all conversion tech the conversion cost + base cost is always slightly more than full cost.
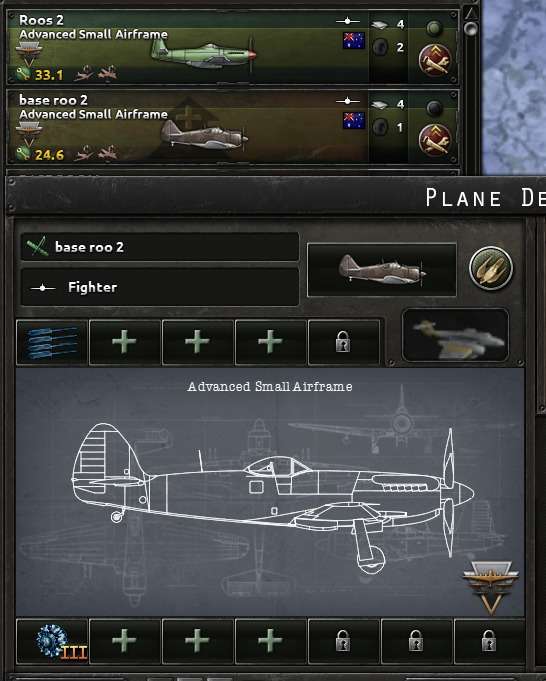
The Fighter 3 Conversion Stable State is Outlined Here:
- Two designs:
- Fighter 3 base design: with the best engine available, with one 4xheavy machine gun. Assign this design as outdated.
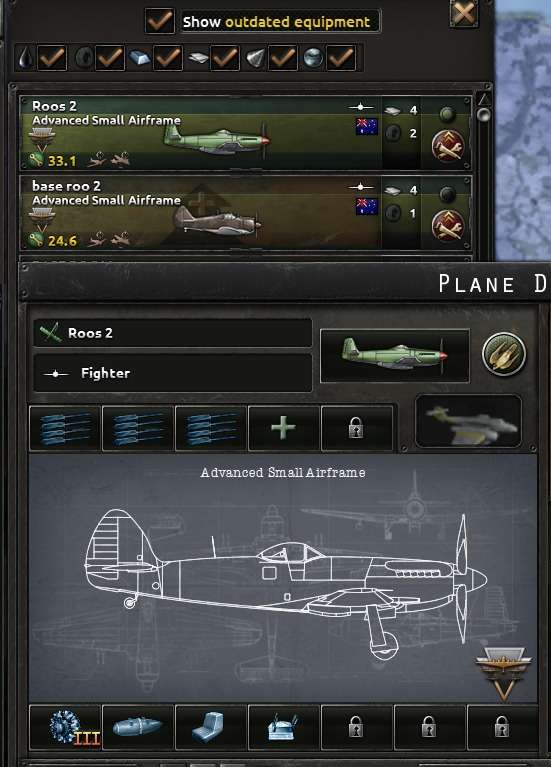
- Fighter 3 full design. Best engine + drop tank + self sealing fuel tank + single lmg turret + three 4x heavy machine gun.
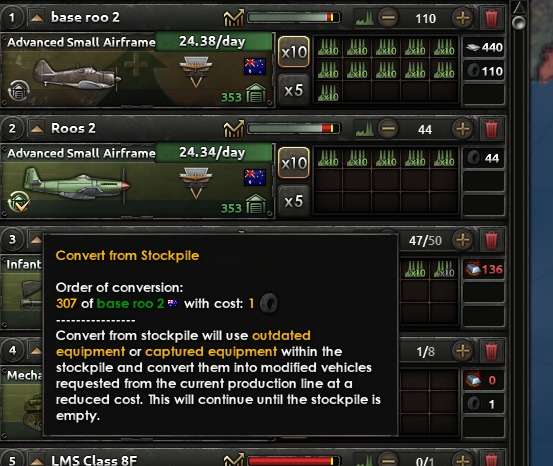
- Two production lines:
- ¾ of the mils producing base design.
- ¼ of the mils converting base design to full design.
Preparing to Do Conversion:
- Before starting conversion, have both conversion industry techs researched.
- Have two production lines pre-prepared: follow the 1-to-3 ratio between the size of the two production lines.
- Important: Try to keep similar efficiency on the two lines! Try to assign new mils to these two lines in sequence.
- When making the designs, make design a) first. Then modify the a) design to b) and click “save as new”. You will be left with both designs. Now assign design a) to be “outdated”.
Warnings:
- Conversion requires a stockpile of base aircraft, so in principle the base aircraft production rate should be slightly higher than that of the conversion rate. However, since base aircraft are not useful for combat, that stockpile should be minimized. So you need to keep the base stockpile >0 but as small as possible.
- When engine is updated, update engine on the base and final aircraft simultaneously, and remember to assign updated engine base aircraft to also be “out of date”.
- When increasing mils, must assign mils to base and conversion in sequence. If the average efficiency on the two lines are different, managing the stockpile becomes very difficult.
- Avoid assigning mils from one line to the other. That way all efficiency on that mil is lost. Instead try to balance efficiency using new mils.
Important Tips
Keep a line of ~5 mils in between the two lines that will switch between producing base and converting. This is a way to replace the need of assigning mils from one line to the other. Since base and final are the same airframe, switching this line from base to final or vice versa only incurs a very small efficiency penalty. When there is too much stockpile, this line converts. When the stockpile is going to 0, this line should be building base.
In practice do not convert fighter 2 as conversion tech is not ready. Try to time the conversion tech with fighter 3, so that all fighter 3 follow this conversion procedure. Before fighter 3 is ready, all production lines should be directly building full fighter 2’s.
How to avoid equipment entanglement: The game sometimes fails to distinguish different equipment if you edit a licensed aircraft consecutively. This means when designing the “base” fighter, make sure you start fresh from the licensed aircraft, and save as new with “base version 1”. When designing the “full” fighter, again start fresh from the licensed aircraft, and save as new named “full version 1”. Make sure you remember this when updating to a better engine on the base and full fighter: go back to the original license and edit from there to obtain “base version 2” and “full version 2” respectively.
Be the first to comment