
Menagerist Trial Guide
Ву Split.
General Notes
Prioritize burning/clay/infernal/immortal modifiers, with:
- Damage and resistance modifiers to your damage/tank pets.
- Immortal, burning, and action-giving (infernal, frostspew) to your spawner pets.
- Resistance modifiers to your support pets.
Good pets are the priority, but weigh items appropriately, and moreso up to R6:
- Early pets can significantly affect your run into the late-game, but obviously fall off with increasing realm depth. Thus prioritizing items up to R6 slightly more so you can build an item bank. Items should accrue early, with the idea of having a good selection to use for the late-gameItem tier list:
- S-Tier: Golden stopwatch, portal key
- A-Tier: Chaos bell
- B-Tier: Teleporter>health potion (tele slightly better but context-dependent)
- C-Tier: Aether dagger, death dice, bag of spikes, earthquake orb
Learning to judge realm difficulty is by far the most important skill in winning this challenge. Second is properly evaluating pet/item rewards.
Pets spawn in a radius 3 around the player, with your oldest (aka weakest) pets spawning in first (e.g if you have 18 pets and try to spawn on a tile with 15 valid tiles, your first 15 pets will come into the realm, with your most recent 3 staying absent that realm):
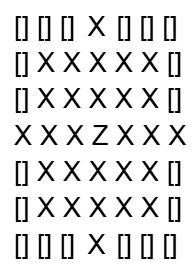
Z indicates the player, X a valid spawning tile, and [] an invalid spawning tile.
Realm-Specific Notes
Listed in relative tiers, meaning something in S-tier might be WAY better than something in A-tier, or it could just be a little better but still notably so. If something’s unranked I trust you, dear reader, to figure things out. Certain base/modifier combinations are better, even if the base-type is worse e.g. a burning treant is usually better than a fae worm ball. These tiers are averages with lots of nuance that would be too wordy to discuss, and plenty of base/modifier combos are valid.
Available pets change with certain realm depth thresholds e.g. warlock pets don’t appear until R7. Note that R2 indicates the actual realm depth e.g. if you just beat R1 and look at the upcoming rifts and pets, those would be R2 pets because the pet shops themselves are on R2.
R1: You want an orc or a burning mid-hp (39-55) pet.
- S-tier: orc
- S-tier: burning
- A-tier: clay
- B-tier: infernal, trollblooded
- F-tier: fae, ghostly
- A-tier: everything else with mid-hp
- S-tier: burning
R2-3: Ideal is 2 good worm balls (or even 2 immortal worm balls which I got once).
- S-tier: worm ball
- S-tier: immortal (drop everything and get this if you see it)
- A-tier: burning, infernal
- B-tier: clay, frostspew, lightning
- A-tier: treant
- S-tier: burning
- A-tier: infernal, clay
- B-tier: metallic
- B-tier: burning/clay pachyderm, burning/clay/trollblooded rock worm, burning/infernal/frostspew witch
R4-6: Ideal combination is 2 strong damage/tank pets (ogre/polar bear/troll/gnome) and 1 silent specter.
- Ogre/polar bear
- S-tier: burning, clay
- A-tier: immortal, trollblooded, infernal
- Troll
- S-tier: burning
- A-tier: clay, infernal
- B-tier: metallic, immortal
- Gnome
- S-tier: clay
- Silent specter
- S-tier: clay
- A-tier: burning, infernal
- B-tier: trollblooded, immortal
- F-tier: metallic
R7-10: Time for the big damage pets.
- S-tier: warlock
- S-tier: infernal
- A-tier: immortal, clay, frostspew, burning (note that when temporary burning summons expire they still do death explosions and potential friendly fire)
- A-tier: blood bear (bloodrage increases both their melee attack and modifier attacks)
- S-tier: clay, burning
- A-tier: infernal, frostspew, lightning
- B-tier: burning/clay stonefish, clay/frostspew fire belcher, burning/frostspew/immortal/lightning earth troll, clay redcap, burning/infernal old witch
R11-12: Pray for splitters.
- S-tier: worm ball shambler
- S-tier: immortal
- A-tier: infernal
- B-tier: burning, frostspew, lightning
- A-tier: bone shambler
- S-tier: immortal (arguably better than immortal worm ball shambler)
- A-tier: infernal, burning
- B-tier: frostspew, lightning
- B-tier: towering toadbeast/spike ball with good modifier
R13-15: Repeat of R4-6, hoping for 2 damage pets (chaos knight, fire wyrm) and 1 banshee, though 2 banshee is completely fine and valid.
- Chaos knight
- S-tier: burning, frostspew, lightning
- A-tier: immortal
- F-tier: infernal
- Fire wyrm
- S-tier: clay
- A-tier: infernal, lightning, frostspew, metallic
- B-tier: burning, immortal, trollblooded
- Banshee
- S-tier: clay
- A-tier: burning, infernal, metallic, immortal
- B-tier: trollblooded
- F-tier: night hags
R16: Pray to everything you can think of for a fae queen. By this point in the run pet tiers are fairly nebulous, as what pets are “best” is more contingent on your existing pets, items, and subsequent weaknesses.
- S-tier: fae queen
- S-tier: clay
- A-tier: burning, frostspew, metallic, infernal
- B-tier: immortal, trollblooded
- A-tier: towering bone shambler (same modifier tier list as R11-12 shamblers but lightning is A-tier), lamasu (clay>burning>infernal/metallic), aelf lightning artist
- B-tier: storm knight, fire/iron/storm fiends (modifier tiers depend on base fiend but immortal>clay>burning/frostspew/infernal in many cases)
R17+: Similar to R16 but with bone shambler megaliths and the fancy fiends (chaos / copper / furnace / insanity / rot / ash) replacing their R16 counterparts.
- Towering bone shamblers and megaliths are good but less enticing than you might initially think, as once they get to the point of actually splitting, you’re often either winning or in dire straits anyway. Lightning is good for getting them to die.
- The fancy fiends are notably better than the base fiends in large part because their spell list prioritizes spawning imps. Chaos fiends and furnace fiends are the best, but friendly fire is a major concern. Insanity fiends are probably the worst. Copper fiends are relatively bad, but their imps hit hard. I’d tier list them as: furnace > chaos > ash > copper > rot > insanity, but modifier is often more important.
General Tips
Spell quantity depends a lot on playstyle and the specific build. I normally like to keep my spell list relatively clean and focus on Skills, like Scrynor said. Extra spells are more likely to get thrown in at the end of the run when SP is more plentiful, so looking at the final build at a win screen can be misleading.
You can (generally) only cast one spell per turn, even if you have ten learned, but you can have any number of skills helping you continuously.
There’s a balance you need to hit. Too few spells learned and you won’t have enough charges to clear a map without drinking potions. Too many and you’ve spent SP on spells you aren’t actually using very often. My suggestion as a baseline to work from: spend between 4-6 total SP on cheap stuff (1-3 cost usually) to get through the first several floors, then save up for something big like a Lord skill that costs 7+. Try to get powerful from that one big purchase, and then you can earn yourself some breathing room to develop the build however you like from there.
I would also say, don’t try to get too fancy with synergies. There absolutely are a lot of really cool, powerful things you can do, but a lot of times just making numbers go big is the most practical way to get through the game. It’s why I advocate strongly for Lord skills—it’s usually just clean, simple damage, charges, radius, etc. Ultimately, there is a massive difference between killing an enemy in one hit versus two, or killing two enemies in an AoE instead of one. Tipping yourself towards those better numbers will make everything go so much smoother.
Easy Win Tips
Easiest Early Game:
Take Lightning Tower on the first floor (if you want to collect all 3 skill points) or the second floor (having a cantrip and Lightning Tower works well). Never upgrade the Lightning Tower, as the 9 damage it does is not significant in the late game.
This is the strongest start I have seen and lets you save up enough skill points, if used carefully and strategically, to do whatever your next move is.
Easiest Mid Game:
Blink with the upgrade to deal damage (Thunderblink).
This casts two Thunderstrikes per blink, and they both cause single-target damage plus AOE stun. Much later, get increased radius or duration for more stun.
- Skill 1: Stormbrood Tricksters (Every blink summons a troll that casts your Thunderblink every few turns; this is huge)
- Skill 2: Silkshifter. If you blink onto a web, then you get the charge of Blink back. And you spawn a web adjacent to you every turn.
You now have infinite Thunderblinks, infinite trolls that cast your Thunderblink, and infinite Thunderstrikes.
- Skill 3: Lightning Frenzy: +4 damage per lightning spell that you cast (Thunderblink triggers this twice per turn). This ends up being about +50 lightning damage.
- Skill 4: Buy Thunderstrike and get the Heaven Strike upgrade. This means it deals holy damage even against 100% lightning-immune enemies. Your Thunderblink will double in damage, and you will no longer have issues with resists. Your summoned trolls will also get all this when they use your Thunderblink too.
- Skill 5: Righteous March: If an enemy dies to holy damage, shield you and all your trolls. This gives you amazing safety.
Be the first to comment