
Guide to Modding Items
What Can You Change?
Item modding in Two Point Museum focuses primarily on changing the visual aspects of an item, however there are some gameplay parameters that can be tweaked as well. The following are some examples of things you can change with our tools:
- Change the textures of an item.
- Change the meshes of an item (by importing your own via a .fbx file).
- Add particle effects, animation or other undocumented features to items (see the Adding VFX or Animation to Items section below).
- Update various gameplay parameters such an item’s name, the effect it has on the environment (temperature, attractiveness etc), how much it costs to place etc.
A more exhaustive list of the various parameters you can change are detailed in the Item Mod Options section below.
Overview of Steps to Create an Item Mod
Currently our mod tools only support creating items in Two Point (other types of mod are coming soon). The steps for creating an item mod are as follows:
- Generate an Item Mod Config.
- Choose an item from the base game that your item will be based on.
- Specify any custom textures/materials/meshes and changes to attributes of your new item in your Item Mod Config.
- Mark all the relevant assets as Addressable (Textures no longer need to be marked as addressable (however icon sprite atlases still need to be).
- Build Addressables (this creates the files to be read by the game).
- Test your item(s) in the PC version of game locally.
- Upload your mod to Steam Workshop once you’re happy.
When you create an item mod your item will appear as a new item in the game (rather than replacing the existing one), so you don’t need to worry about your mod conflicting with mods other people make!
While no programming knowledge is required to make mods for Two Point Museum, some steps may require a basic working knowledge of the Unity Editor. We encourage users to consult Unity’s documentation for further information on certain aspects of the pipeline.
Creating an Item Mod Config
In order to start creating your first item mod you need to create an Item Mod Config. Each mod config represents a single item, you’ll need to generate a new Item Mod Config for each new item you want to appear in-game. In the Assets/ExampleMods directory you can find some examples already made to demonstrate some of the features available.
We recommend that you follow a similar folder structure to the example mods here. For example, a reasonable folder structure might be to place your mods in Assets/Mods with a subdirectory for each mod such as Assets/Mods/MyPlantMod and Assets/Mods/MyDoorMod.
In order to make your first Item Mod Config right-click anywhere in the folder you’d like it created and select Create->TPS->Config->ItemModConfig. It’s important that you always create a new one this way and do not copy and paste an existing one without generating a new ID attribute (see Item Mod Options section below for more information on the ID attribute).
Once you’ve created your first Item Mod Config select it and you should be presented with the Item Mod Config Inspector on the right:
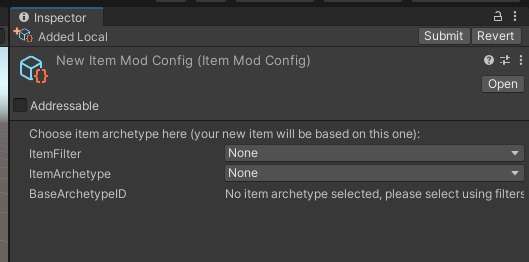
Please ensure that the ‘Addressable’ box is checked, otherwise you won’t be able to see your mod in-game.
From here you need to choose an item from the base game for your item to use as an archetype. For example, if you want to make your own bench you should choose one of the existing benches. To find an item you can either use the Search box or use the Item Filter.
If using the Item Filter, first select an Item Filter from the drop-down (for items that you know belong to a certain room, it’s easiest to just select the room here) and then select the item from the Item Archetype drop-down.
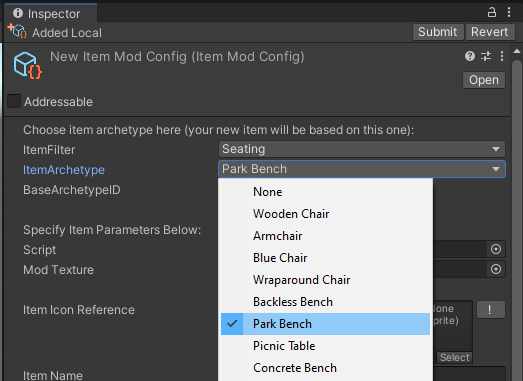
Once you’ve chosen an item archetype a bunch of options will appear below (and may vary slightly depending on the item chosen), see the Item Mod Options section below descriptions of each of these settings. Now you’re ready to make any changes you want to the item, including changing name/description/icon, meshes/textures and other gameplay attributes.
Assigning Meshes and Materials / Textures
If you’re not planning to change anything visual on the item you’re modding you can skip this section.
Once you’ve created your Item Mod Config you may want to assign new meshes/materials/textures that you’ve made. Meshes need to be in the .fbx format, you can just drop them into the directory you want in your project and Unity will import them automatically.
Meshes will need a material assigned to them for them to display in-game properly (this is also where you can assign textures), please see the Creating Materials and Importing Textures sections for further information. For details of which meshes can be overridden see the Item Mod Options section below.
Note that when replacing the meshes of an existing item, you should try to keep the approximate size/shape of the original item to avoid characters in-game clipping through your new item. The easiest way to achieve this is to extract the assets for the original item from the game for reference, see the Extracting the original game assets section below.
Currently we do not support changing the collision or character interaction points of an item, but we may add support for this later.
All Meshes and will need to be marked as Addressable before they can be assigned in your Item Mod Config. To do this simply select the little check box in the top-left of the Inspector for the respective asset. Materials (and textures if they’re within a Material or Prefab) no longer need to be marked as addressable, however icon sprite atlases still need to be.
Most assets referenced directly by your Item Mod Config will need to be marked up this way.
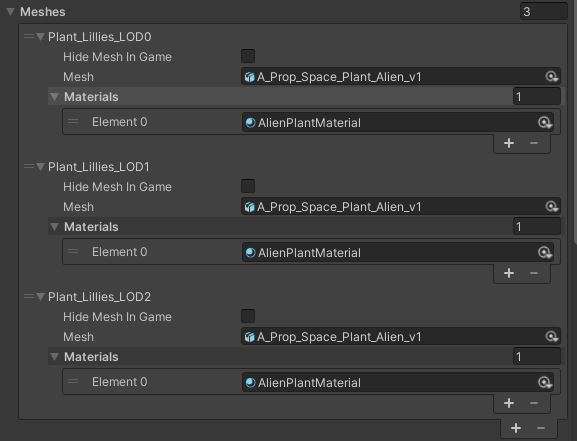
LODs
Most of the meshes for items in Two Point Museum have 3 LODs (Level Of Detail meshes), each of which is drawn when the item is at the appropriate distance from the game’s camera. LOD0 is the most detailed version (with the highest poly count) which is drawn when the camera is very close to the item, whereas LOD2 is the lowest detail one that’s used when the camera is zoomed out.
For most items you won’t need to worry too much about this (you can just drag the same mesh into all three slots), but if your item is particularly complex with a large number of polys then you might need to consider generating some lower detailed meshes to use as LODs, particularly if you want your mod to run nicely on lower spec machines or consoles.
Preparing to Export Your Mod
Once you’ve made all the changes you want to your Item Mod Config and are ready to test your creation in-game, first you’ll need to ensure all your Item Mod Configs are marked as Addressable (see the previous section).
Once you’ve done this, navigate to Window->Asset Management->Addressables->Groups. Here you can see all of the assets you’ve marked as Addressable arranged into groups, they should appear in the ModConfigs (Default) group by default. In this menu you can also drag and drop assets directly into a group as another way of marking them as Addressable (and remove items too).
We strongly recommend that you only have your actual Item Mod Config assets in this default group, and that you create a new group for the rest of the data associated with each item (like we’ve done with the example item mods), you can drag and drop to move assets between groups. The reasoning behind this layout is that this way your item’s data will only be loaded into memory when actually used in a level, this will save memory on platforms where this resource is scarce (e.g. on consoles).
Be sure to remove all the example mod configs + assets from the groups, delete the example data groups and create new ones for your new items (Right Click-> Create New Group -> Packed Assets) and then rename these new groups to something that better describes your items.
Once all your assets are arranged into the groups you want, select Build->New Build->Two Point Modding Build Script to export your mod.

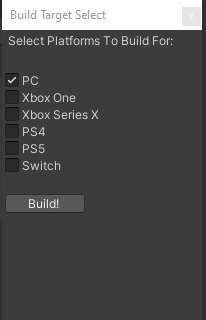
From here you can toggle which platforms you’d like your mod to be used on (currently only PC is supported). Please note that PC covers Windows, Mac and Linux based platforms. The ‘Exported~‘ folder will separate the mods into their own platform based folders.
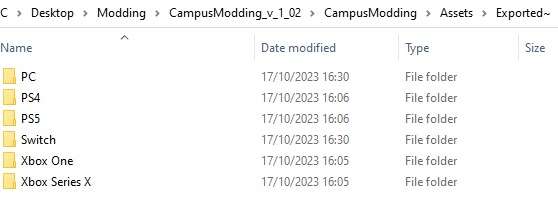
Note: It’s important that you always delete the contents of this directory each time you make a new build.
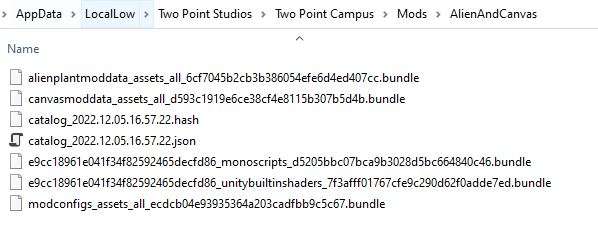
In order to test your mod locally (before uploading to Steam Workshop) you’ll want to copy all these files from the PC folder into the staging directory for mods in Two Point Museum. This can be found in your AppData directory (normally C:\Users\YOUR USERNAME\AppData\LocalLow\Two Point Studios\Two Point Museum).
In this folder create a new folder called Mods if it doesn’t exist already, and within there a subfolder for your mod. Copy all the files from the Assets/Exported~/PC directory above into this new folder, It should look something like this:
Once you’ve done this your new items should appear in-game! Please note that they may not appear in Freshleigh Meadows (the tutorial level) until you’ve progressed far enough to unlock all items for purchase. Also note that any items tied to rooms won’t show up until their respective room has been unlocked and placed (for example, if you decide to create a new toilet door).
We recommend starting a Sandbox level to test mods if you’ve progressed far enough in the game to unlock that feature.
Uploading Your Mod to Steam Workshop
Finally, if you’d like to distribute your mod you can upload it to Steam Workshop. You have two options here, you can either use the Steam Workshop upload tool built into the Unity project (tools -> Steam Workshop Upload Tool), or alternatively there is a standalone version that launches when you run the Two Point Museum: Modding SDK from your Steam library.
Both offer similar functionality. For further information on this process, visit our Steam Workshop Upload Guide here.
Item Mod Options
Here is a list of the available options you can tweak in your Item Mod Configs. In most cases if the base item had certain settings then these will be pre-filled with the base item’s values (e.g. an aircon unit will have a temperature modifier that you can modifier or remove as you please).
- Item Icon Reference – This is a reference to the Icon sprite you’d like to use for your item. Your sprite will need to be included in a Sprite Atlas (see details of how to set this up see Creating a Sprite Atlas for Icons below). If no sprite is provided here then the game will use the icon from the base item archetype.
- Item Name – Here you can specify the name of your new item.
- Item Description – As above, but for the item’s description that will appear in-game.
- ID – This is the unique ID assigned to your item. This is generated when you create your Item Mod Config, but you can generate a new one by pressing the ‘Generate’ button here.
- Item Cost – This is the amount your item will cost to purchase in-game.
- Kudosh Cost – This is how much your item will cost to unlock with Kudosh in-game. A value of zero will mean the item won’t require Kudosh to unlock.
- Environment Attribute Modifiers – These modifiers are how your item will affect the environment surrounding it (such as Temperature, Attractiveness etc). See the Environment Attributes section below for more details.
- Has Room Capacity Modifier – Ticking this will give access to Room Capacity Modifier details where you can specify how much this item increases the capacity of the room it’s in.
- Room Power Modifiers – These allow you to increase the effectiveness of certain rooms (e.g. Medical, Research). For more details see the Room Power Modifiers section below.
- Mesh Prefab – This is an advanced feature. It allows you to specify a prefab containing your own meshes etc arranged how you like to be merged with the base archetype in-game. Typically this will be used in conjunction with disabling all existing meshes (see below) to completely replace the visuals of an item.
- Hide All Base Item Meshes – Select this option if you want to automatically hide all existing meshes on this item. This is useful if you want to provide your own mesh prefab instead of overriding individual meshes (as above).
- Texture Only Mod – This options will disable mesh/material assignment and replace it with simpler texture-only assignment options per mesh (see below)
- Textures – This only appears if you select Texture Only Mod, this just serves as an easier way to make a texture-swap mod for an item (for example, if you’re just creating your own picture or rug). You can provide your textures here instead of creating new materials and assigning them per Mesh. When using this method, we strongly recommend that you look at the original textures used in the base item for reference (all the original assets are listed at the bottom of the inspector, see Extracting the original game assets for reference above).
- Meshes – This is a list of meshes that currently exist on the base item. Here you can override each mesh and its materials with your own (see the guide on creating materials below) or individually opt to hide each one. The name of the mesh in most cases should give a hint as to what the original mesh is, however if you’re uncertain and want to see the original for reference you can extract the original assets from the game to compare (see Extracting the original game assets for reference above). If you scroll down to the bottom of the inspector you will see a list of all the meshes and the original assets they reference in the base game (including meshes, materials, shaders and textures).
- Use Existing Customisation Variants – Some items in the game are composed of both a base item visual and a customisation variant that the player can choose from (for example plants have different plant pots). At this time we do not support creating items with multiple customisation options, however by default modding one of these items will automatically assign the first customisation variant from the base item. If you untick this box you can choose to override that customisation variant with your own meshes/materials (see below).
- Hide All Customisation Variant Meshes – You can tick this to hide all of the customisation variant meshes in-game (rather than ticking to hide each individually below)
- Customisation Variant Meshes – Here you can modify the meshes of the customisation variant associated with this item (see above). This works identically to overriding the base meshes.
- Use Existing Random Variants – Some items have random variants (each time you place the item, some aspect of the visual is randomised). At this time we do not support creating items with multiple random variants, modded items will automatically use the first random variant from the base item. You can choose to override this variant by unticking this option.
- Hide All Random Variant Meshes – You can tick this to hide all of the random variant meshes in-game (rather than ticking to hide each individually below)
- Random Variant Meshes – As above, but for Random Variants
- Maintenance Materials – If the base item has logic for changing materials when maintenance reaches a certain threshold (for example, plants when they need watering) and you’ve specified a new material for the meshes above, then you will need to specify any new materials here as well. If you don’t specify them then you may find your materials get swapped out in-game unexpectedly!
Environment Attributes
There are currently three possible environment attributes an item can affect in-game, when they start applying relative to an item’s current maintenance can also be adjusted via the Value, Radius in Cells, Start Applying Level and Maintenance Value Modifier fields.
The available attributes are as follows:
- Temperature – Use this one to affect the temperature in a certain radius. Positive values increase temperature, negative decreases.
- Attractiveness – This attribute allows you to control how an item affects the attractiveness of your museum in an area. Similar to temperature, positive values increase attractiveness whereas negative ones decrease it.
- Humidity- This attribute affects the humidity game attribute in the radius surrounding the item
The adjustments work as follows:
- Value is the amount of the chosen attribute above that this item applies in the given radius
- Radius in Cells is the radius the environment attribute modifier is applied in
- Start Applying Level is the level maintenance needs to be at (0 – 100) before the Maintenance Value Modifier will start kicking in (scaling linearly from Start Applying Level to the lowest possible maintenance). Confusingly, this works in the reverse way to how you’d expect in-game; a Start Applying Level of 25 means that when maintenance drops below 75% then it will start applying. Similarly, if you set this to 0 it will start applying immediately and if set to 100 then it will only apply when maintenance is at 0 in-game.
- Maintenance Value Modifier is a modifier of the Value that’s applied if maintenance starts dropping. e.g. if you have a Value of 1 and a Maintenance Value Modifier of -0.75 then when maintenance reaches 0 in-game the value applied will drop to 0.25 (1 – 0.75).
The way this system works can be confusing, here are a couple of examples to help better understand how these values work together:
Example – Leafy Plant
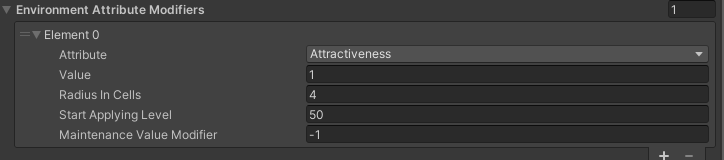
- Item starts are full attractiveness (Value of 1) which it applies in a radius of 4 in-game cells (Radius in Cells)
- When maintenance drops below 50% (Start Applying Level of 50), the attractiveness drops based on how low the maintenance is, such that it ends up at 0 attractiveness when maintenance hits rock bottom (the -1 from Maintenance Value Modifier cancels out the +1 initial Value attractiveness)
Example – Bin
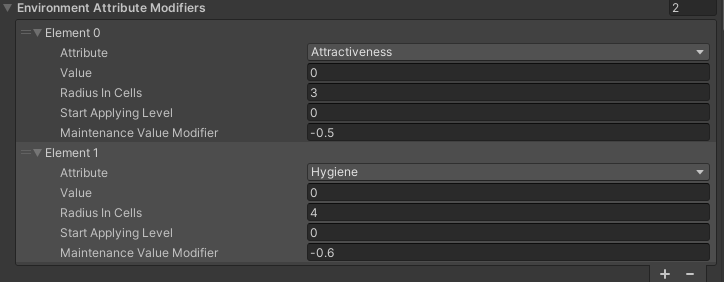
- Item starts providing both 0 Attractiveness and 0 Hygiene
- Start Applying Level is 0, which means the Maintenance Value Modifier will start scaling the moment maintenance starts dropping in-game
- When maintenance drops to its lowest possible value, the Maintenance Value Modifier is in full effect thus applying -0.5 Attractiveness and -0.6 Hygiene to the surrounding area
- If maintenance in-game is at 50%, the item will apply -0.25 Attractiveness and -0.3 Hygiene to the surrounding area (as this value scales linearly)
Room Power Modifiers
Room power modifiers allow an item to contribute to the effectiveness of a room’s primary function. These modifiers often work in combination with a staff member’s skill in that area and any machine’s current upgrades.
Here are some examples of items in Two Point Museum that have room power modifiers:
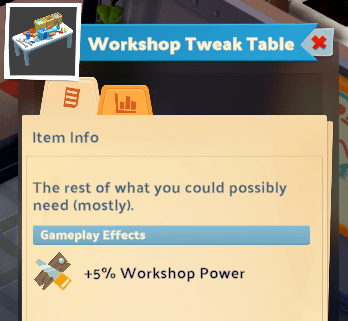
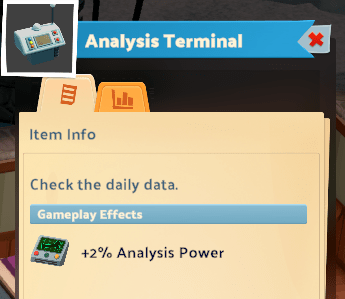
The percentage modifiers of each item in a room are all added up to form the total boost to that power (with some diminishing returns for multiples of the same item). The screenshots above show the typical percentage range most items with these modifiers in the game contribute.
When adding a room power modifier to an item mod you can specify the Power Type and Percent.
The current available room power modifiers are Analysis, Workshop, Training and Marketing.
Extracting the Original Game Sssets
When making new textures or meshes for an item you’ll likely need to look at the original assets for reference (especially when just modding the texture of an item, as your new texture will need the same layout).
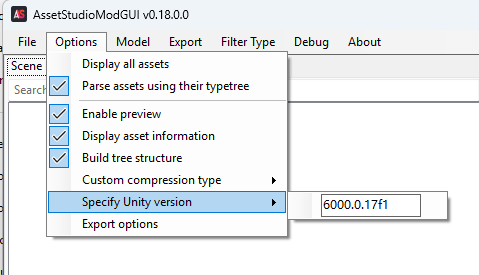
There are freely available tools online that will let you extract the assets from most Unity games, one we recommend is Asset Studio which you can find here (note, this is a newer/updated version compared with the one used to extract Two Point Campus assets). You can use this tool to peek inside the game’s asset bundle files and extract the assets that you’re interested in (in this case, it will be the assets you can see at the bottom of the Item Mod Config inspector for the item you’re modding).
If we look at the example Inverted Canvas mod’s Item Mod Config we can see this list of meshes and the textures they use:

Note: When using one of these programs to extract assets you’ll likely need to specify the exact Unity version in the application’s options (in this case, you’ll want to specify version 6000.0.17f1).
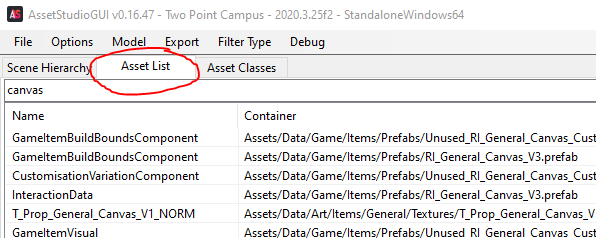
The path of the original asset may give you a hint as to which .bundle file you can find the asset in, though it’s probably easiest just to open all of the bundle files (select File->Open Folder in Asset Studio and select the TPC_Data folder where you game is installed) and use the search tool in Asset Studio (which is in the Asset List tab):
Note: When importing 3D assets using Asset Studio into Maya or Blender, note that the meshes end up being 100x smaller. When exporting your modified .fbx be sure to scale your mesh up appropriately to compensate (otherwise it will look tiny in-game).
Creating Materials
You need to create a material in Unity in order to apply textures to any new meshes you wish to use. You can create a new material asset by right clicking in the directory you want to create it and selecting Create -> Material.
Once you have your new material, select it to reveal the material inspector on the right. The first thing you’ll need to do is select the right shader for your material, for most purposes we strongly suggest using the Two Point/Lit shader in order for your item to appear correctly in-game. You can also use the Two Point/Transparent shader if your item has a mesh that requires some transparency.
Note: If you choose to use a non-Two Point shader then it’s likely that your mod will not function properly on non-Windows platforms.
Note: Sometimes the Two Point shaders in the modding project appear under “Failed to compile” section, this is fine and won’t affect how your mods function in-game.
The options you’ll have in this editor will vary depending on the shader you select and the material type selected within (if using the Two Point/Lit shader). As a starting point, you’ll want to apply Albedo (diffuse), Normal (normal map) and Smoothness (specular map) textures to an item. See the Importing Textures section below for details on importing textures to apply to your materials.
Please note that Materials no longer need to be marked as addressable.
Importing Textures
Before you can assign textures to your materials you will need to import them into Unity. We use the .TGA format for most of our textures in Two Point Museum, but you can use .PNG files (or other formats) under most circumstances too.
To Import a texture copy it into the desired directory in your modding project, Unity should then import the texture automatically for you. There are also some important settings that may need to be addressed below. You can view the import settings of a texture by selecting the texture once it’s been imported into Unity, the settings will appear in the inspector on the right:
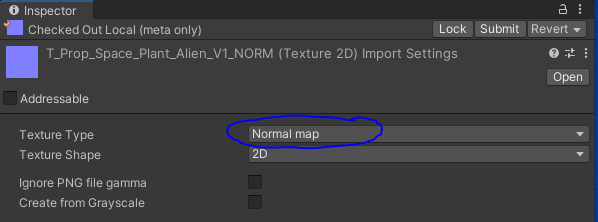
Texture Type
You may need to adjust the Texture Type in the import settings depending on where the texture will be used, under most circumstances the Default setting is fine but if the texture is a normal map then you will need to select Normal map for it to work properly in-game.
When importing textures for use as 2D sprites/icons (rather than materials for 3D objects) you should select the Sprite (2D and UI) type (see Creating a Sprite Atlas for Icons below for more details on sprites/icons).
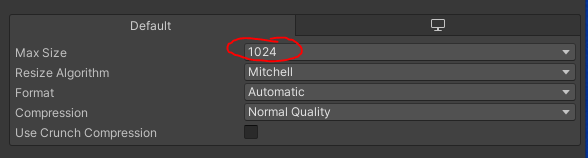
Texture Size
We recommend keeping the Max Size option for your textures at 1024 or less (maybe 2048 max for exceptionally large/detailed objects). Ideally you should use the smallest size you can get away with without sacrificing too much visual fidelity.
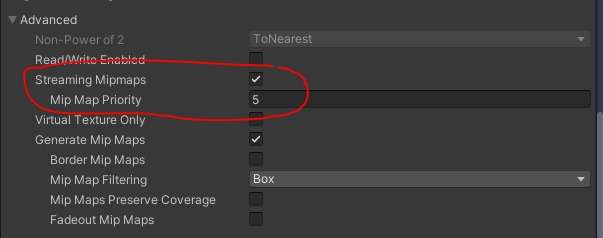
Mipmap Settings
These settings are not applicable for 2D sprites, only for textures being applied to materials for use on 3D meshes.
The mipmap settings appear under the Advance options in the texture import settings. It’s important that the Streaming Mipmaps option is enabled for all textures as this helps significantly with performance in-game. The Mip Map Priority can be kept at 5 for diffuse textures, and ideally 0 for normal, specular and metal map textures.
Note: Textures should no longer be marked as addressable if they are in a Material or a Prefab (however icon sprite atlases still need to be, as do textures that are dragged directly into your ModConfig).
Creating a Sprite Atlas for Icons
All icons that you want to use for your mod items need to be in a Sprite Atlas. You can set up a new icon as follows:
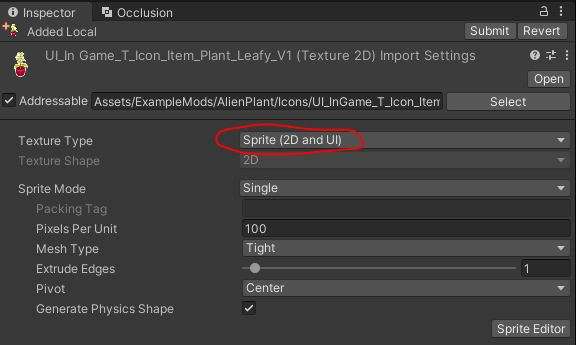
- Import the .PNG icon that you wish to use by copying it into the desired directory in your modding project (Unity should pick it up and automatically import it). Icons in Two Point Museum are typically 256 x 256 pixels in size. If you append _Icon to the name of your image before importing, the correct import settings should be automatically selected for you, however we’ll cover what the settings should be below just in case
- Select Texture Type of your asset in Unity as Sprite (2D and UI) in the inspector
- In the desired folder Right Click -> Create -> 2D -> Sprite Atlas
- Select your newly created Sprite Atlas, then under the Objects for Packing section in the inspector add your new Sprite then click Pack Preview
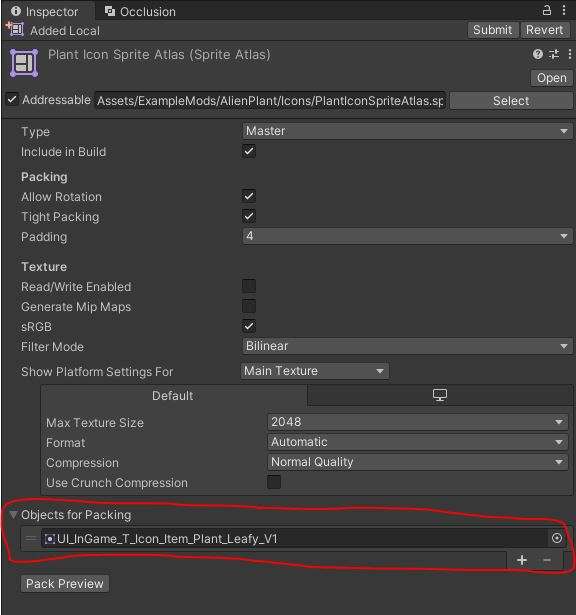
- Ensure your Sprite Atlas and the sprite itself are marked as Addressable
- In your Item Mod Config, simply drag the Sprite itself (not the Sprite atlas) into the ItemIconReference field
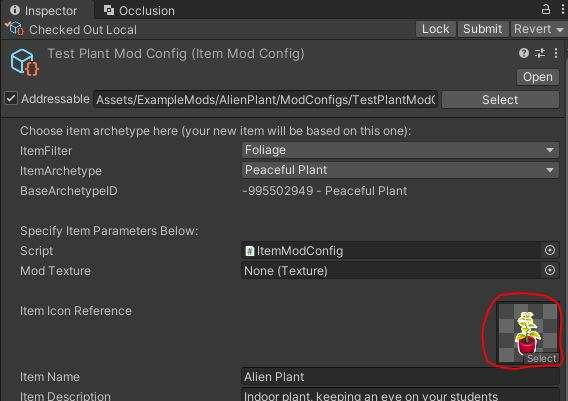
- A preview of your icon should now appear in the Item Icon Reference inspector. If you see a button with an exclamation mark to the right, it means that your sprite could not be found in a Sprite Atlas (revisit steps above to ensure it’s been added to one properly)
That should be it! Once you’ve exported your mod and loaded it in-game it should now have your updated icon throughout the UI.
Adding VFX or Animation to Items
In order to add particle systems or animation to items (or any other advanced features/VFX) you’ll need to create your own prefab in Unity, drag your mesh into your prefab and implement your features there. Once you’ve made your prefab you can drag this into the Mesh Prefab parameter in your Item Mod Config (Note: Ensure your prefab is marked as Addressable); everything in your prefab will appear in-game (you can select Hide All Base Item Meshes if you only want your prefab to appear and none of the existing meshes).
Creating your own prefab is considered an advanced feature and may require some existing knowledge of Unity. Details of how to create your own particle systems etc are beyond the scope of this guide, we urge you to refer to the Unity documentation (or other Unity tutorials) for further details.


Be the first to comment